Intégration basique (mode interne - LEGACY)
Voici un guide d'intégration développeur pour les fonctionnalités de base de SecuSign en mode interne (LEGACY, décommisionné en Janvier 2025).
Some definitions to start... ✈️
SecuSign a a simple and robust API for electronic signature under a ‘simple’ level compliant to eIDAS regulation. Through the API, Client is able to run a signature transaction for one or more signatories. SecuSign will handle all the steps of signature workflow and cryptographic measures, and the Client keep the responsability to simply provide the url link (generated by SecuSign) to signatories, for signing.
SecuSign can handle different levels of signature (simple, advanced, qualified). This basic guide is only about 'simple' level.
Transaction :
A « transaction » is the full workflow of signature. It is like the « main folder » which is in relation to all the other lower elements which depend on it. To work with SecuSign, first of all Client have to create a new Transaction and then send the file to be signed in this transaction.
The Client is able to create, update, view details, or delete a Transaction. However, some Status of the transaction will prevent certain actions at certain stages (for example, you cannot update a Transaction if the status is already « sent »).
Fields of a Transaction are :
- UID (unique identifier of the SecuSign Transaction)
- Status (created, sent, completed, cancel)
- Sent date
- Created date
- Completed date
- Cancel date
- Webhook URL (a callback that Client can save to be inform about status changes)
- PDF file to be signed
Transaction can be managed throught the following endpoints (all need basic authentification) :

‘Sent’ status is decide by the Client, through /update/. It starts the signature workflow.
Signatory
A « Signatory » is the user of the service, who was requested by the Client to sign the Transaction’s PDF document. At least, 1 Signatory should exist in relation with a Transaction to be able to pass its status to ‘Sent’.
Endpoints for Signatory are :

The signature workflow for Signatory is made up of 3 steps : Identification, Authentification, Signature.
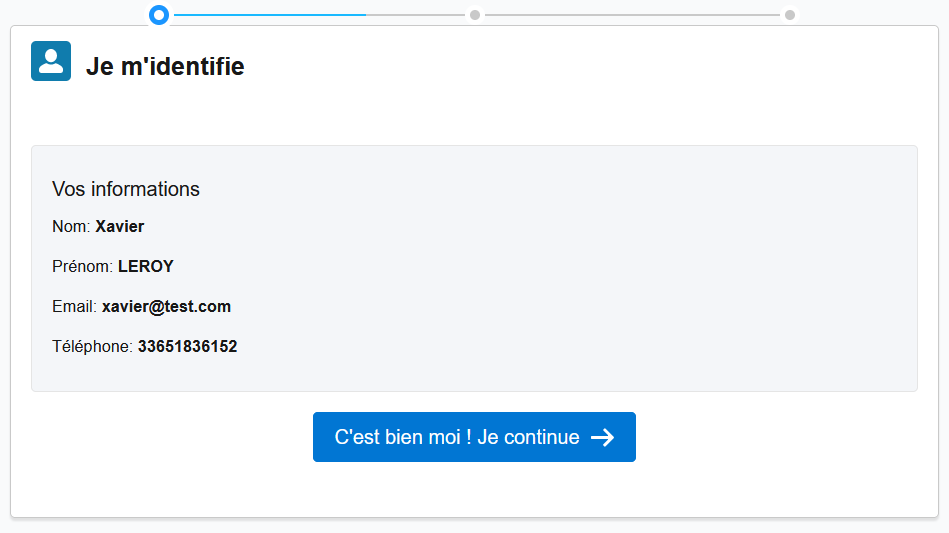
Identification
In the context of 'simple' level of Signature, there is no identification of the Signatory before the authentication process by OTP. It means that anyone with the url link created during /signatory/new can acceed to the signature workflow.
Authentication
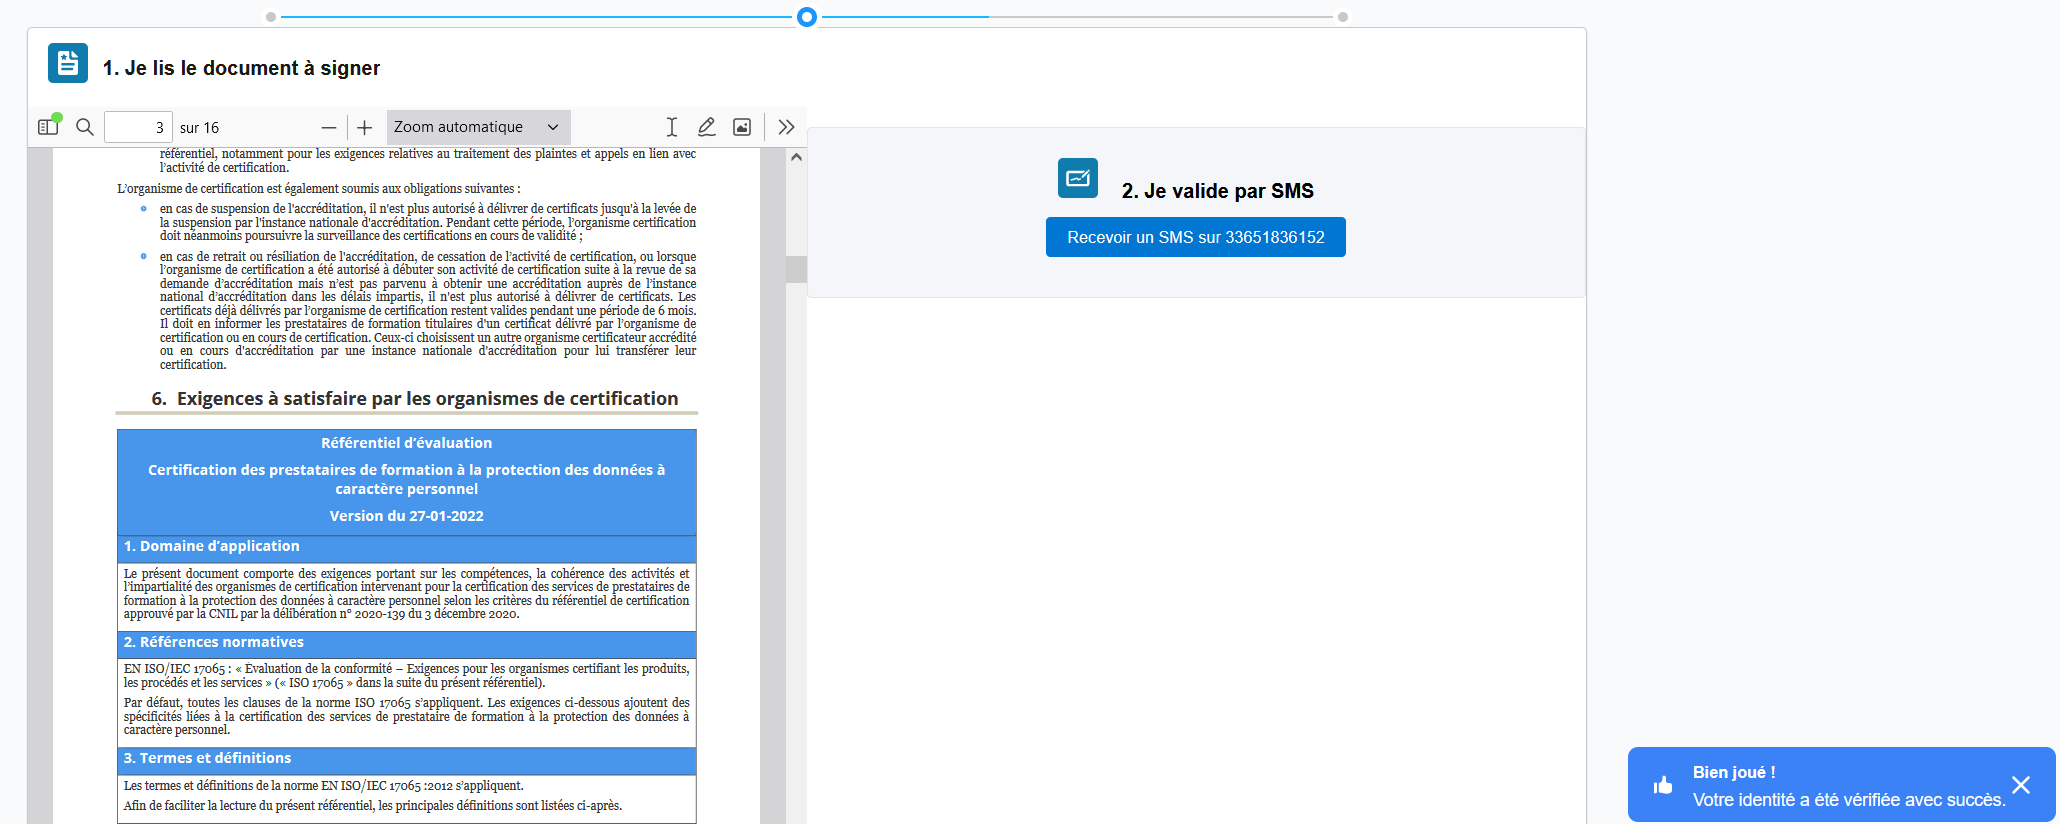
This step is fully managed by Datasure through the SecuSign workflow, and consists of authentication of the Signatory which has been previously identified by a Identity Provider. When creating a Signatory, the Client defines which kind of authentification he wants for this Signatory (for example, « sms »).
An Authenticate Token is generated when the Signatory wants to sign. In the case of sms, it sends an OTP through Signatory’s phone to confirm. When the OTP is confirmed, it validated the Authenticate Token and unlock the cryptographic signature (next step).
Signature
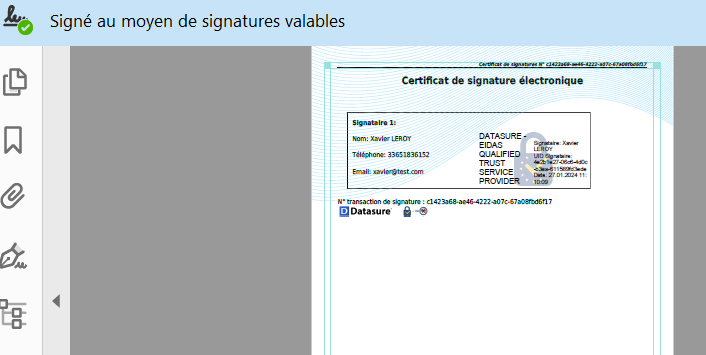
This 3st (and last) step is about signing the PDF document. This step is only possible if Identification and Authentification steps have been successfully passed. This step will create the Cryptographic signature in the PDF document (PAdES format) and add an additional final page to the pdf as a visible signatures certificate.
Authenticate Token
Depending the type of Authentification asked by Client for the Signatory, an Authenticate Token will be generated when the Signatory attempt to sign, after being successfully identified. This Authenticate Token will be permanently link to the Signatory of the Transaction only when the challenge is successfully passed.
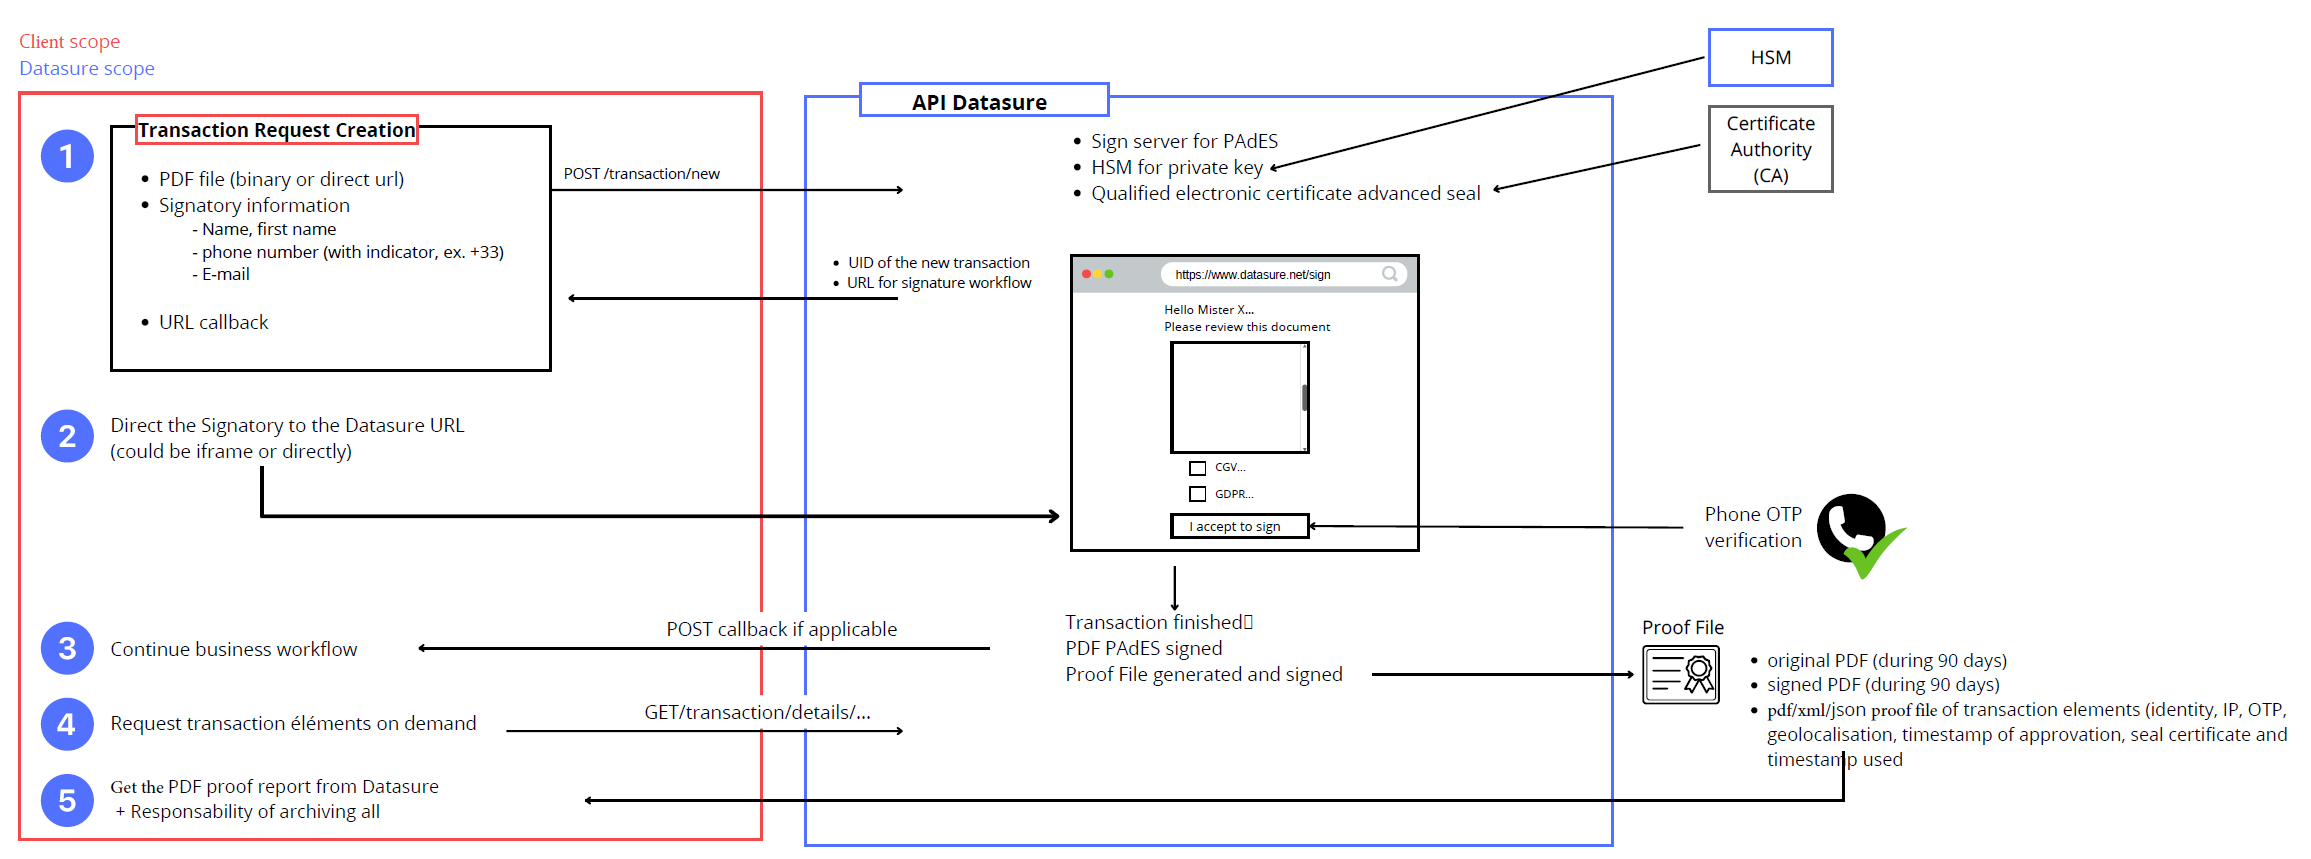
Diagram of integration Client-Datasure

Complete workflow example
Here is an example from A to Z about what Client has to do to create a full workflow of electronic signature with SecuSign API.
A new transaction has to be created 📁, with all the details needed :

Reference : https://docs.datasure.net/reference/48f673477a48975ddbd097eb622b62eb
You receive this kind of answer when Transaction successfully created, and you need to keep the uid of the transaction :
{ "uid": "5c7955f7-fe96-48c7-bff3-d621f7482b8b", "status": "created", "created_at": "2024-01-27T08:45:54.000000Z" }
Note 30/12/2024 : a valid SecuSign subscription and a white_label_uid is now mandatory to be able to create a SecuSign transaction.
You now have to create one or more signatories 👨 👩, attached to the Transaction created. 📁

Reference : https://docs.datasure.net/reference/1f44f72050425ae5e06569c07aa365b8
You receive this kind of answer :
{ "uid": "8a6ff96d-196f-40a4-80af-abe4f61f743b", "firstname": "John", "lastname": "Doo", "phone": "33651836133", "email": "[[email protected]](<>)", "language": "FR", "created_at": "2024-01-27T08:51:58.000000Z", "transaction_uid": "5c7955f7-fe96-48c7-bff3-d621f7482b8b", "signatory_url": "https://my.datasure.dev/secusign/transaction/5c7955f7-fe96-48c7-bff3-d621f7482b8b/8a6ff96d-196f-40a4-80af-abe4f61f743b/workflow" }
Depending the level of signature (simple, advanced or qualified), the identity verification process is different. 🛂
Identity verification for Simple level
For Simple signature level, the identity verification is automatically approved as soon as you're creating the new signatory.
4 - Give the URL of the SecuSign workflow to your Signatory
When the identity of your Signatory is successfully verified by an IdP, you want to ask him to sign. Client keep the responsability of this, so you have to send to him the URL provided by Datasure (signatory_url) at the signatory creation step. 📧
By the way, the signatory_url can also be built by yourself at any time: https://my.datasure.net/secusign/transaction/<uid_of_transaction>/<uid_of_signatory>/workflow
5 - Signatory is signing the document
The front workflow has 3 steps : Identification (it will be pass automatically if the user is already identified by Idp), Authentification, Signature. ✏️
Step 1 (Identification) :

Step 2 (Authentication)

Step 3 (Signature) :

Signature step will add the final page with information about the signatory, and also the cryptographic seal of Datasure for each Signatory.

The signed PDF is archived in relation with the concerned Signatory. All subsequent signatories, from a chronological point of view, will be presented for signature with the latest up-to-date document (i.e. possibly signed by the previous signatory).
A transaction can handle up to 4 signatories maximum.
6 - Get transaction information
At this point, you may want to be inform when all signatories have successfully signed the document. The transaction will pass to status « Completed » when all is done, and you can trigger your own app by the webhook callback URL you can register to the transaction when you created it.
You then can request any transaction details at any time (especially on the trigger event). If the status if on Completed, the API will also give you a temporary direct url ton download the signed pdf and the related evidence file.

7 - Get evidence file
You also can retrieve the evidence file (PDF, JSON, or XML) at any moment of the workflow. 🔐
Reference for PDF Evidence File : https://docs.datasure.net/reference/d208f0e22092ec2cf5139a441c560f2d
Updated 7 months ago
